Chapter 11
Using the Elements Panel
In This Chapter
![]() Using the Elements panel to organize and work with elements
Using the Elements panel to organize and work with elements
![]() Using the Timeline in conjunction with the Elements panel
Using the Timeline in conjunction with the Elements panel
The Elements panel is located in the top-right corner of the screen. You can do a number of things from the Elements panel, including selecting elements, opening actions for an element, setting the visibility of an element, locking an element, and nesting one element into another element. You can also name, or label, elements from the Elements panel.
The Elements panel remains empty until you create your first element, such as a text box or a rectangle, or you import an image. However, you can always see the Stage in the Elements panel.
Operating in the Elements Panel
The Elements panel provides a useful means to help organize and work with elements. From the Elements panel, you can do several things:
 Add actions
Set visibility
Lock elements
Nest elements
The Elements panel updates along with the Timeline and vice versa, which is discussed in the next section. You can find the Elements panel in the top-right corner of the interface (as shown in Figure 11-1).
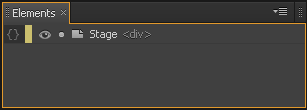
Figure 11-1: The default view of the Elements panel shows the Stage.
Managing Stage actions
Chapter 5 discusses actions in detail, along with triggers that you can add to the Stage, but here I discuss how to use actions for the Stage from the Elements panel.
Adding Stage actions
To open the Actions box from the Elements panel, simply click the Open Actions icon, which is shown in Figure 11-2 along with a full list of all possible actions that you can add to the Stage.
The first nine actions listed in Figure 11-2 are unique to the Stage. The remaining actions — from click to focus — are used for elements as well. You can find a description of those actions in Chapter 5.
For some of these Stage actions, a designer with no coding experience may want to shy away from using certain actions that are code-intensive. However, even code-wary designers can use some Stage actions, such as keydown and keyup, to good effect. After a list of definitions, I provide some quick steps for using keydown and keyup.
Here is a brief description of what you can do with each of the Stage actions:
creationComplete: Fires immediately after a Symbol is created and initialized but before autoPlay occurs.
beforeDeletion: Fires just before a Symbol is deleted.
compositionReady: Fires after the composition is ready to play but before autoPlay occurs.
keydown: Fires after the user presses an assigned key (find the example code after Figure 11-2).
keyup: Fires after the user stops pressing an assigned key.
scroll, orientationchange, and resize: These are page-level events.
onError: Fires when an event handler causes a JavaScript error.
 For more information on these Stage actions, see the Adobe Edge Animate JavaScript API, which is available at
www.adobe.com/devnet-docs/edgeanimate/api/current/index.html
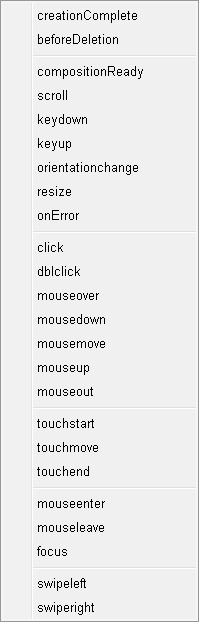
Figure 11-2: Create Stage actions from the Elements panel.
 The following example code works with a keydown Stage action. All of the code preceded by double slashes (//) are notes to help explain what the code does. The actual code starts with
 if. After you choose keydown on the Actions menu, you must then choose how you want that action triggered. In this example, I chose Play. Before I chose Play, however, I placed the cursor directly after the bracket (and then pressed Enter on the keyboard to start a new line, then pressed Tab for the correct spacing), because that is where I want to insert the Play code (highlighted in bold). In this example, the animation plays when the user presses the spacebar.
// insert code to be run when the user presses a key.
// The variable "e.which" tells you the key code of the key that was pressed, e.g. 32 = space
if (e.which == 32) {
sym.play();
// do something
}
The following example code uses keyup, which works in the same manner as keydown. Now, when the user releases the spacebar, the animation stops.
// insert code to be run when the user stops pressing a key.
// The variable "e.which" tells you the key code of the key that was pressed, e.g. 13 = enter
if (e.which == 32) {
sym.stop();
// do something
}
You can use a particular Stage action only once per composition.
Adding audience control
In the following procedure, I explain how to use Stage actions to allow your audience to both start and stop an animation from playing by pressing and then releasing the spacebar.
1. Start a new composition. From the Properties panel, in the Stage section, uncheck Autoplay.
2. Create a simple animation on the Stage, such as a rectangle moving from left to right.
3. From the Elements panel, click Open Actions next to Stage and choose keydown.
4. In the code box, place the cursor after the bracket (press Enter to start a new line and then Tab over) and then choose Play from the menu on the right side.
Your code should look like the example shown earlier in the Technical Stuff note.
5. In the code box, click the + icon (near the top left) and choose keyup.
This step creates a second action for the Stage.
6. Place the cursor after the bracket, like you did in Step 4, but this time, choose Stop.
7. Close the code box to save your changes.
If you preview from the Stage, the animation simply plays as though you didn’t add the actions. To see your Stage actions in operation, you must preview them in a browser. To get the animation to start, press and hold the spacebar. To stop the animation from playing, release the spacebar.
Setting visibility
The third icon in the Elements panel, after the actions and the color bar, looks like an eye. You can click this icon to set the visibility of an element. Figure 11-3 shows elements that are visible and that aren’t visible. When an element isn’t visible, the eye turns into a circle.
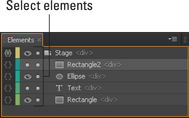
Figure 11-3: Setting element visibility.
When you turn the visibility off for an element, it no longer appears on the Stage. However, keyframes for invisible elements still appear in the Timeline.
If you preview the animation in a browser, all of the elements appear, regardless of how the element visibility is set.
 Don’t confuse the Visibility feature with the Display feature, which is discussed in Chapter 8. Here are the differences between the two:
Visibility: Refers to showing or hiding elements on the Stage. You can hide elements on the Stage to reduce clutter. All invisible elements still appear when you preview in a browser. Visibility is used as part of the editing process for uncluttering the Stage.
Display: Refers to whether the element appears or not, both on the Stage and in the Preview. Display is used in the animation creation process.
When you click the eye-icon of a parent element that contains nested elements, the child element’s visibility is also affected, as shown in Figure 11-4. However, clicking the eye of a child element doesn’t affect the parent element. You can set the visibility of nested elements separately. If you turn off the visibility of a parent element, the child element’s Visibility icon is dimmed.
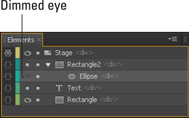
Figure 11-4: The child element whose parent is invisible appears with a dimmed eye.
Locking elements
You can lock elements from the Elements panel. Locking an element means that you can’t edit that element.
This is useful if you have an element that overlaps another element and you don’t want to accidentally select and start editing or moving that element.
When you want to lock an element in place so that you don’t accidentally change it, click the circle to the right of the eyeball (Visibility icon). Locked elements have a lock icon next to them, as shown in Figure 11-5.
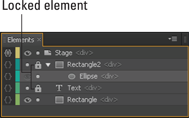
Figure 11-5: Lock elements so that you don’t accidentally edit them.
Nesting elements
When you nest elements, you create a hierarchy of parent and child elements. The top-level element becomes the parent and the second-level element becomes the child. Nesting is useful if you want the parent element to affect the child element in terms of position and size and other properties.
To nest one element within another, simply click and drag one element into another element. The element that you click and drag becomes the child, and the element that you dragged it into becomes the parent.
The parent element has a drop-down arrow that you can use to display or hide the child elements. Figure 11-6 shows nested elements, with the drop-down arrow showing the child elements and a parent element with the child element rolled up.
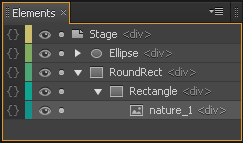
Figure 11-6: Nest elements to create parent and child elements.
Edge Animate has nesting rules:
You can
• Nest rectangles into other rectangles.
• Nest images into a rectangle.
• Nest text boxes into rectangles.
• Have tiers of nest boxes.
You can’t
• Nest one text box into another text box.
• Nest images into a text box.
• Nest rectangles into text boxes.
Coordinating with the Timeline
The Timeline and the Elements panel work hand-in-hand. When you make changes in one, you see the same changes appear in the other. For example, if you name an element in the Elements panel, that name appears in the Timeline. However, if you nest elements, you can see that effect in the Elements panel, but you won’t see the nesting in the Timeline. Rather, in the Timeline, you see the keyframe properties for an element, which you don’t see in the Elements panel.
Features that are coordinated between the Elements panel and the Timeline include the following:
Color-coordinated elements
Copy and paste elements
Naming elements
The Elements panel and the Timeline both have narrow colored bars for each element. These colored bars provide you with a visual clue about which element is which when you’re looking back and forth between the Elements panel and the Timeline.
When you have several keyframes in the Timeline, the color coding becomes a significant aid in coordinating which elements in the Elements panel correlate with which keyframes in the Timeline (see Figure 11-7).
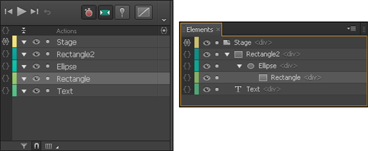
Figure 11-7: Color-coordinated elements in the Elements panel.
Copying and pasting
Just as you can copy and paste elements from the Timeline, you can copy and paste elements from the Elements panel: Simply right-click an element and choose Copy (or press Ctrl+C). Then right-click and choose Paste (or press Ctrl+V).
 When you copy and paste elements, Edge Animate follows these rules:
When you paste an element, it retains the same properties as the one that you copied.
Keyframe animation sequences associated with a copied element don’t copy over.
If you copy a parent element, you also copy the child element; therefore, when you paste, you create copies of both the child and the parent.
If you copy a child element, you don’t also copy the parent element.
When you paste an element, Edge Animate gives it the same name as the copied element but appends Copy to the end (see Figure 11-8).

Figure 11-8: Copied elements have the same name except for the word Copy.
Naming elements
Giving elements names other than Text, RoundRect, or RoundRect2 is useful if you have a complicated Timeline with many elements. By naming elements, you create an easy way to find and select elements from both the Timeline and the Elements panel.
Give elements relevant names. For example, if you have a rectangle that you want to use as a menu bar, name that element, Menu bar. If you name it Long Rectangle Along the Top, not only does Edge Animate truncate that name (along with adding underscores between each word; because spaces in names are not allowed), but also it may become confusing later if you add a second long rectangle along the top of your animation.
The “Name” is used by Edge Animate as an ID in the HTML markup. What you type in as “Name” in the Elements panel shows in the ID attribute of the HTML element in the HTML markup. IDs have specific naming conventions, one of them is that IDs cannot contain spaces. They also can’t start with a number; here’s a URL that provides additional information:
www.w3.org/TR/html4/types.html#type-id
To name your element, simply double-click it from the Elements panel, and then type a name as shown in Figure 11-9.

Figure 11-9: Double-click an element to name it.
Follow these rules for naming elements:
Give it a short name so you can see the full name in the Elements box.
Give it a relevant name and not something cute and funny. That way, you know what that element is six months later when you reopen your project.
Don’t use spaces or odd characters when naming an element. If you do, a blue icon appears, with the information shown in Figure 11-10.
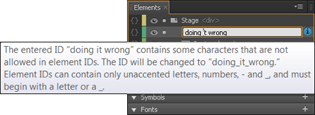
Figure 11-10: Use only unaccented letters and numbers with no spaces.