Chapter 2
Discovering Awesome Features and Tools
In This Chapter
![]() Getting to know the essential animation tools
Getting to know the essential animation tools
![]() Creating interactive, responsive animations
Creating interactive, responsive animations
![]() Exploring font, language, and publishing options
Exploring font, language, and publishing options
![]() Seeing how Edge Animate supports your coding habit
Seeing how Edge Animate supports your coding habit
Adobe Edge Animate CC is a powerful, flexible program for creating and publishing animations for the web. In this chapter, I introduce you to many features of Adobe Edge Animate CC, including essentials such as the Stage, the Timeline, and familiar drawing tools. And I tell you about the options that Edge Animate provides for publishing and saving files, as well as choices it offers for your interface language and for web-friendly fonts. For those who like to dive below the surface, I describe the framework of the JavaScript API and working with native HTML in the code panels that Edge Animate places at your disposal. And — probably most important in this day and age of multiple screen sizes — you find out about creating a responsive web design that resizes itself to fit various devices.
Meeting Your Most-Used Animation Tools
Building even a basic animation in Adobe Edge Animate CC involves using three primary tools:
 Stage: The Stage is a live HTML window built directly into Edge Animate. It’s where you draw elements such as rectangles, squares, and circles. Later on, you can add style and animations to those elements and even add actions such as links. You can also import images to the Stage — which you can also animate and make interactive for your audience. Finally, you can use the Stage to preview your animation.
Timeline: This part of the screen is where you add keyframes and animation sequences that make your composition come alive. From the Timeline you can edit where, when, and for how long an animation sequence takes place.
Drawing toolbar: You can draw rectangles, rounded rectangles, and even ellipses, including perfect circles, using the drawing tools. Also included is a Text tool so you can write text within your animation. Adding elements to your animation is one of the first steps in creating a composition in Edge Animate.
These three tools — the Stage, Timeline, and Drawing toolbar — are essential to creating an animation. The Stage is where your composition comes alive; the Timeline is where you plot your animation sequences; and the drawing tools help you create the elements that become the assets of your animation.
Putting a spotlight on the Stage
The majority of the Adobe Edge Animate CC interface consists of the Stage. The Stage is where you build your animations. When you first open Edge Animate, and you choose to create a new file, you’re presented with a crisp, white, blank Stage from which you can start to build your project (see Figure 2-1).
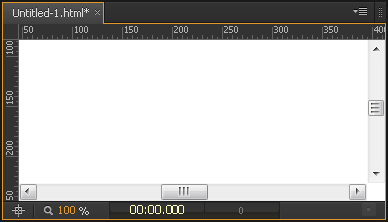
Figure 2-1: A blank Stage to get you started.
The Stage is located at the top center of the interface and has the following handy characteristics for creating your animations:
It is a live HTML window: At first, the Stage may not look like much — but as you create your animation, you notice an abundance of functionality.
 One of the Stage’s best features is that you can watch your animation play on it. You don’t necessarily have to switch to a browser to preview your work. Instead, you can preview your animation by watching it on the Stage — because the Stage is actually an HTML window. It’s virtually the same as a standard web browser, but it’s built right into Edge Animate.
It has rules and guides: Two additional features to the Stage are the rules and guides shown in Figure 2-2:
• One ruler runs along both the top of the Stage; another runs down the length of the Stage on the left side. You can use these rulers to help place your assets (such as images and text) on the Stage.
• The guides are thin purple lines that stretch from the ruler across the Stage and to the opposite side of the screen. You can use these guides to help position your elements on the Stage. (Elements can be anything from drawn circles and rectangles to images to text boxes and other parts that make up the animation.)
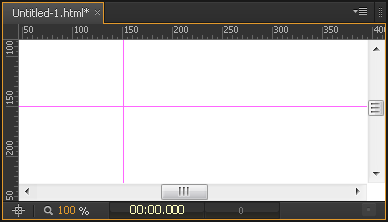
Figure 2-2: The Stage, with horizontal and vertical guides shown.
To place a guide on the Stage, place the cursor over the ruler, and then click and drag. The purple guide then appears. To move the guide around the Stage, click it and drag it.
After you place guides on the Stage, any elements (images, text boxes, and such) then snap to the guides. This helps you place elements exactly where you want them.
Engaging the intuitive, accurate, and flexible Timeline
Besides the Stage, the Timeline is probably the feature you use most often with Edge Animate. You find the Timeline at the bottom of the screen, and it contains many features, as follows:
Keyframes: You use keyframes to direct when, and for how long, an animation unfolds on the Stage. The colored bars in the Timeline, shown in Figure 2-3, represent keyframes and indicate when an animation starts, stops, and for how long it will play. You can edit these keyframes with a click and a drag.
Mode toggles: The Timeline also allows you to toggle different modes, such as Auto-Keyframes, Auto-Transitions, and the Pin, and you can choose different Easing attributes.
Animation enhancements: From the Timeline, you can tweak your animation in multiple ways — for example, by adding actions (see Chapter 5), specifying filter elements (see Chapter 4), and enabling Timeline snapping (also Chapter 4).
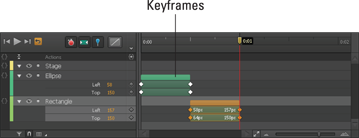
Figure 2-3: The Timeline.
Drawing with familiar tools
If you’ve ever used other drawing or image editing software, then you most likely recognize the drawing tools available in Edge Animate. If Edge Animate is the first artistic software you’ve used, then just relax as you discover that drawing elements such as rectangles and circles is as easy as clicking and dragging.
You can locate the drawing tools at the top of the screen, directly underneath the menu, as shown in Figure 2-4.

Figure 2-4: The drawing tools.
The drawing tools include a rectangle, a rounded rectangle, an ellipse for drawing circles, and a text tool for drawing text boxes.
Exploiting Features That Interact and Adapt
Adobe Edge Animate CC is about much more than moving elements around the screen. You can use many of its features to create interactivity for your audience — and fine-tune many more to configure the software to suit your preferences:
Interactivity: You can build fully interactive animations with such controls and actions as buttons, links, and loops.
Symbols: You can save elements you create (such as buttons) and use them again in a different animation.
Responsive web design: Edge Animate enables you to build a composition that responds to browser and device window sizes.
Multiple publishing options: Edge Animate offers numerous ways to publish your animation for use in different applications — such as different web browsers and iBooks — or you can import your Adobe Edge Animation into different Adobe products such as InDesign or Muse.
Font choices: Edge Animate provides a multitude of font choices. If you’re fussy about particular fonts, the good news is that if you can find a font on the web, you can most likely use it in your animation.
Choose your language: If English is not your native language and you prefer to work in (say) German, Spanish, French, or Japanese, then Edge Animate has you covered.
Implementing interactivity intelligently
Adobe Edge Animate CC enables you to do much more than just draw and animate elements. You can also make those elements interactive, which allows your audience to click on items to make different actions happen. For example, you can make Stop, Play, and Pause buttons for an interactive slideshow. You can also create a menu by adding links that allow your audience to navigate to different parts of your animations — or to entirely different web pages.
When your audience moves the cursor around your animation, you can make different actions happen when the cursor moves over specific areas. This kind of cursor movement is called a mouseover. Or, if your audience is using tablets or smart phones to view your animation, you can allow them to simply tap an element to cause an action.
Using Symbols to make reusable objects
At first, using Symbols may prove a bit daunting, but after you gain experience working with them, they become indispensable.
So, what exactly is a Symbol? It’s essentially a nested animation you create that has its own independent Timeline and interactive capabilities. For example, say that you find yourself creating the same element with the same actions over and over for many different projects. By saving that recurring element as a Symbol, you can reuse it and its associated actions for any project. A prime example of a Symbol is a button. If you find yourself recreating the same button — say, a Play button for a slide show — you may want to save that Play button as a Symbol for reuse later.
You can find your Symbols in the Library panel, as shown in Figure 2-5.
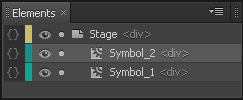
Figure 2-5: How Symbols appear in the Library panel.
Edge Animate allows you to export and import Symbols. You can also copy and paste Symbols from one project to another for ease of use. You can even copy and paste Symbols that contain other Symbols. In addition, you can export a Symbol as a separate .ansym project and import it into another project. See Chapter 12 for information on creating and using Symbols.
If you do find yourself using Symbols regularly, then rejoice when you find that you can export and import more than one Symbol at a time. Edge Animate combines multiple Symbols into one .ansym file when you export them; you can have a number of them in a single directory without worrying about conflicts. Plus, you can import those multiple Symbols by using that one file instead of several — especially useful if, besides that Play button, you also want to reuse a Stop and Pause button as well.
Incorporating responsive web design
Right along with HTML5, responsive web design is the latest buzzword terminology when it comes to web development. A responsive web design allows your animation to resize appropriately depending on the size of the browser window. This can mean many things. Say, for example, someone is viewing your animation on a desktop computer. If the user resizes the browser window to make it bigger or smaller, the elements within your animation resize themselves appropriately, with the new sizes based on percentages. For example, if the browser window is maximized at 100%, the images and so forth in your animation appear at 100%. If the browser window is shrunk to 50% of its size, then your images also shrink to 50% of their normal size.
This is a very powerful feature because there is such a wide variety of screen sizes these days. You never know whether your audience is viewing your animation on a 60-inch display, a 4-inch iPhone, or anything in between. Tablets add to the diversity of screen sizes.
Adobe Edge Animate CC handles responsive design by using percentages instead of hard coded pixels. This enables you to concentrate on your animation and not have to worry about how it appears on a myriad of screen sizes.
Counting your multiple publishing options
You have more than one way to publish animations these days — and Adobe Edge Animate CC has you covered, offering a multitude of options (as shown in Figure 2-6). You can publish your animation as a standalone web page or you can embed it in an existing web page. You also find options that allow you to export your animation for use in an iBook. You can even publish your animation as a static HTML page for use on older web browsers that don’t support HTML5 or animations.
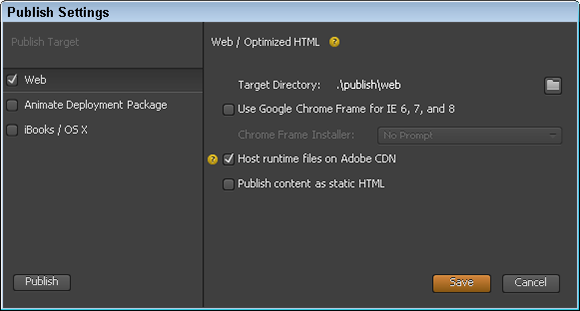
Figure 2-6: The Edge Animate publishing settings.
 The static HTML files are still written with HTML5, and the animations still play. The difference is that the elements are not created via JavaScript when Edge Animate generates the static file. Instead, they exist in the HTML file. This arrangement is good for search engine optimization (SEO): Some search engines, when they find elements created dynamically with JavaScript, don’t interpret those elements correctly.
Putting your best font forward
You can use a multitude of fonts on the web, and Adobe Edge Animate CC has you covered. In addition to a standard default list of fonts that are available to you (see Figure 2-7), Edge Animate also enables you to import fonts from around the web.
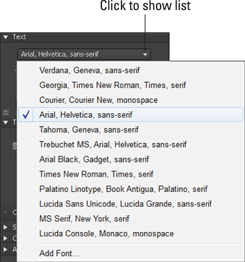
Figure 2-7: Default font list.
If none of these fonts satisfy your needs, you can import fonts from many different sources — including Google Web Fonts. You can also use Adobe Edge Web Fonts, which is built into Animate. And if you’re familiar with Typekit (another free font tool), you can celebrate knowing that tool also works with Edge Animate.
Keep in mind that Typekit is a tool for the very experienced user: You can also use your own font, or one that you purchased, but you have to host the font on your web server. To do so, you have to create a style sheet with an @font-face rule and place it in the project file folder. Here's how:
1. In Edge Animate, in the Web Font dialog box, type this line:
<link href="mystyle.css" rel="stylesheet" type="text/css">
Another dialog box appears.
2. In this second dialog box, input the name of the font as specified in the style sheet.
If you need more information on how to write the Cascading Style Sheet (CSS) code for a custom font in the style sheet, you can find it here:
http://blog.freelancer-id.com/2010/06/02/custom-font-for-all-browsers/
I discuss fonts in more detail in Chapter 12.
Working in your language of choice
Adobe Edge Animate CC is global in many regards — including the language you see on menus and panels. If you feel more comfortable working in a language other than English, Edge Animate makes it easy for you to change the language used in the software to one of many popular languages.
From the Help menu, as shown in Figure 2-8, you can choose from several different languages. When you choose a language from the Help menu, that language appears in the software. The languages that you can choose from include German, English, Spanish, French, and Japanese.
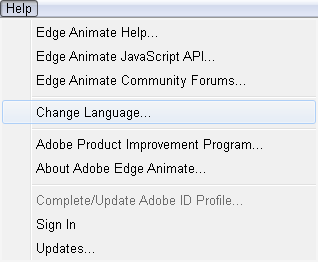
Figure 2-8: The Change Language option from the Help menu.
If you do pick another language, you have to close and restart Edge Animate to see the change take effect. After you select the language that you want, the interface does not automatically update, simply close the program and then reopen it to see your newly selected language.
Digging into the Code
Adobe Edge Animate CC makes the creation of animations possible for a range of users — from those who consider working with code a challenge to experienced developers and engineers who eat code for breakfast. On the one hand, you really don’t need any coding skills to create professional animations with Edge Animate; on the other hand, Edge Animate provides
Native HTML5 code, which is very clean — no proprietary or unnecessary code. This helps make the code easier to read and understand for everyone.
A persistent code panel, which gives you access to editing the code by hand.
JavaScript API (application programming interface), which provides an opportunity to learn the details behind the code.
Designers without coding skills can relax knowing they can still create compositions without knowing any code at all. Meanwhile, experienced developers can salute Adobe for providing access to all of the background code.
Working in native HTML
While you work in Edge Animate, the software is constantly creating code behind the scenes. While you don’t necessarily have to know any HTML or JavaScript to create animations, if you do happen to have some coding skills, then you can celebrate — Edge Animate creates very clean HTML code without any proprietary baggage.
 If you want to get into the code, then consider the HTML file that Edge Animate creates as the only file that you may need to open. Edge Animate does create several other types of files, including JavaScript files, but those files are dense with code. If you are not a developer, then good advice is to steer clear of those files.
If you’ve already built several websites and don’t want to create your animation from scratch, you’re in luck: You don’t have to start over from the beginning. A great feature of Edge Animate is that you can import existing HTML files — which gives experienced web developers a head start with Edge Animate.
HTML5 is the big thing with web development these days, right along with CSS3. If you’re wondering what HTML5 is, the best way to describe it is that it’s the future of the web. So, by using Edge Animate, you are placing yourself at the forefront of web technologies. And the best part is, you don’t have to know how to code to use it; Edge Animate creates the code for you.
The HTML5 code generated by Edge Animate is clean and contains no extra code, as shown here:
<!DOCTYPE html>
<html>
<head>
<meta http-equiv="Content-Type" content="text/html; charset=utf-8">
<meta http-equiv="X-UA-Compatible" content="IE=Edge"/>
<title>Untitled</title>
<!--Adobe Edge Runtime-->
<script type="text/javascript" charset="utf-8" src="Untitled-1_edgePreload.js"></script>
<style>
.edgeLoad-EDGE-15449885 { visibility:hidden; }
</style>
<!--Adobe Edge Runtime End-->
</head>
<body style="margin:0;padding:0;">
<div id="Stage" class="EDGE-15449885">
</div>
</body>
</html>
This HTML5 file simplifies animation playback. Here’s why:
After you upload the HTML file and the associated files (usually through FTP to your web host server), you and your audience can view the animation in a web browser.
You can copy and paste a snippet of the code (shown next) into an existing web page, like this:
<!--Adobe Edge Runtime-->
<script type="text/javascript" charset="utf-8" src="Untitled-1_edgePreload.js"></script>
<style>
.edgeLoad-EDGE-15449885 { visibility:hidden; }
</style>
<!--Adobe Edge Runtime End-->
If you copy and paste the code snippet just shown into an existing web page, you must also upload the associated JavaScript files, images, and so on that are part of the file and folder structure that Edge Animate creates when you save a composition. You also have to add a div with the composition ID into the body tag, as in this example:
<div id="Stage" class="EDGE-15449885"></div>.
Coding easily with the persistent code panel
You can use Adobe Edge Animate CC without knowing a single bit of code. However, if you are a developer who likes to hand-code, you can do so with the code window. You have two options when using the code window:
You can view the full code. Figure 2-9 shows what you see: all the code in the actions file for the particular animation you’re working on. This view is extremely helpful; you don’t have to keep clicking back and forth between code snippets.
Use the Full Code mode to view and edit your actions file. You can activate this mode by clicking the Full Code button in the top-right corner of the code editor.
You can view a specific action’s code. When you have the code window open, you see a list of actions on the left side. By clicking one of those actions, you can edit the code for only that action (see Figure 2-10).
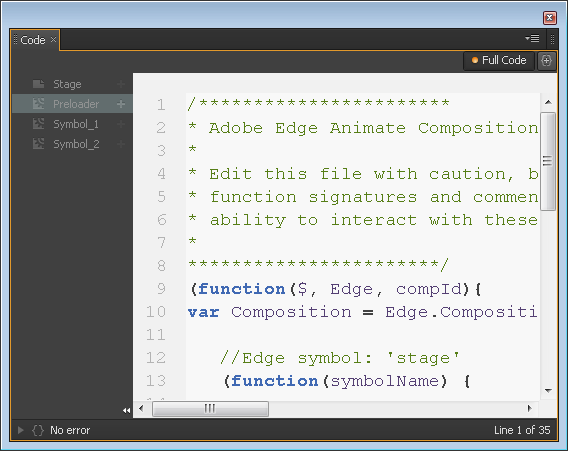
Figure 2-9: The Full Code panel.
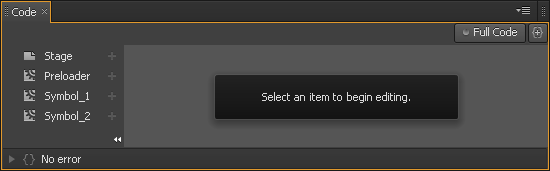
Figure 2-10: Selecting a Specific Action to edit the code.
To open the code window, from the menu, choose Window and then Code as shown in Figure 2-11.
You can use a keyboard shortcut to open the code window by pressing Ctrl+E.
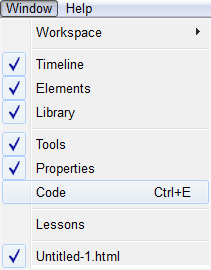
Figure 2-11: Opening the code window.
Pulling in the JavaScript API
An Adobe Edge Animate CC JavaScript API is available for the hardcore coders out there. For those who know nothing of JavaScript or writing code, don’t fret; massive code-slinging isn’t necessary in order to create animations. However, if you do like to lift the hood and poke around in the engine, then the JavaScript API provides an excellent resource.
You can find the JavaScript API here:
http://www.adobe.com/devnet-docs/edgeanimate/api/current/index.html
API stands for application programming interface and is a common tool that programmers use for writing and debugging code. Of course, if you want to educate yourself on how to code, looking into the workings of APIs can get you started. Keep in mind, however, that APIs generally don’t provide beginner-level information; they assume that you already know how to code.
The Adobe Edge Animate CC JavaScript API gives you plenty to explore:
Adobe Edge Animate CC overview: This section of the API gives you a general introduction to the program.
Triggers, events, and actions: These features of Edge Animate execute your code for you (such as looping) or when your audience interacts with different parts of the animation (such as clicking a button).
Tools and pointers for creating Symbols (reusable embedded animations): Especially useful are the Edge Animate Symbols, which are self-contained behaviors, Timelines, and graphics.
JavaScript API: This is the standard JavaScript interface, a handy tool in its own right, especially when you like to hand code specific aspects of your animation projects.
Advanced topics: After you’ve got some coding practice under your belt, these topics offer some adventurous directions to explore (for example, creating multiple compositions in a page).
Figure 2-12 provides an example of what you can find in the API.
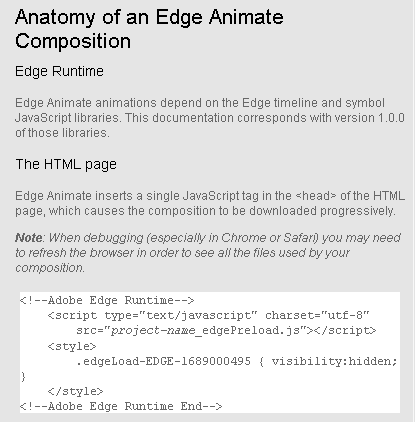
Figure 2-12: An excerpt from the Adobe Edge Animate CC JavaScript API.