Chapter 13
Creating a Project Structure
In This Chapter
![]() Automating the project structure
Automating the project structure
![]() Editing files
Editing files
![]() Structuring folders and files for use with other software
Structuring folders and files for use with other software
Adobe Edge Animate provides the means for you to create animations for the web, for use with InDesign and Muse, and for tools like Apple’s iBooks Author. You can save your compositions in any number of ways, depending on how you set your publishing settings.
In this chapter, I discuss the folder structure that Edge Animate creates and the files within those folders. I make these explanations worthwhile by explaining what you can do with all these files.
Understanding the Files Edge Animate Creates
When you save your Adobe Edge Animate project, the software creates several different files and folders. In addition to a special folder for your images, Edge Animate creates an edge_includes folder. I cover all these folders here in this section along with details about the different files that Edge Animate creates.
 Even if you are strictly an animator and don’t know a single thing about code, I still recommend that you gain a familiarity with what makes Adobe Edge Animate tick. After all, you never know when you may have to dig in to the file and folder structure to find something in particular or to tweak a line of code. Here, I walk you through the basics, so you can understand what Edge Animate creates as output.
Figure 13-1 shows a sample file and folder structure.
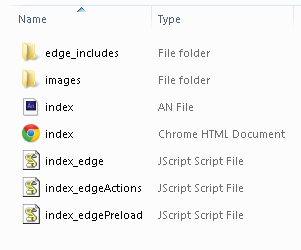
Figure 13-1: Edge Animate creates an entire file and folder structure for you.
Saving your composition
You can work and preview compositions in Edge Animate without saving your work. However, the software doesn’t create files or folders until you click Save. When you do save your work, Edge Animate creates an entire structure of folders and files for you.
To save your work, click File on the main menu and then choose Save or choose Save As to save under a different filename (see Figure 13-2).
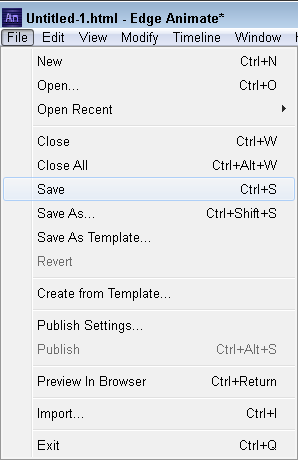
Figure 13-2: Saving your work from the File menu.
Before you save your work, create a folder on your hard drive in which you want to save your work. You don’t necessarily have to create a special folder just for your images, though this is generally considered a best practice. Even if you import your images from several different locations, when you save your work, Edge Animate groups all your assets together and organizes them for you in a folder structure.
Animate files
When you save your work, one of the files that Edge Animate creates is called an Animate file. All Animate files are designated with the extension .an. For example, myfirstproject.an, or index.an.
Figure 13-3 shows how the Animate file appears (it has the purple square icon next to it) in your folder structure in Windows.

Figure 13-3: You can recognize the Animate files by the purple square icon.
If you click the .an file from the folder structure, Edge Animate boots up, and your project opens.
JavaScript files
Edge Animate actually creates two sets of JavaScript files for you when you save your project:
 One set of files is found in the
 edge_includes folder, as I discuss later in the chapter in the section Edge_includes folder.
The other JavaScript files are found alongside the Animate file and the HTML file.
Figure 13-4 shows an example of what these JavaScript files look like in the folder structure.
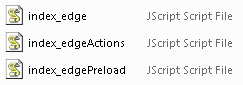
Figure 13-4: JavaScript plays an important role in making animations.
If you try to open these JavaScript files by clicking them, you may get an error message. The different example JavaScript files shown in Figure 13-4 do the following:
index_edge: In this example, the name of the project is index. Therefore, the name for each JavaScript file starts with the name of the project.
Within this particular JavaScript file, you can find definitions for symbols.
index_edgeActions: This file contains JavaScript code for the actions you created within the composition.
For more information on adding actions to your composition see Chapters 5 (working with actions in general) and 11 (working with stage actions from the Elements panel).
index_edgePreload: This file contains JavaScript code for the preloader.
For more information on preload, see Chapter 14.
 Don’t open and play around with the JavaScript files unless you’ve had experience coding JavaScript. Designers and animators without coding experience really don’t have to open these files at all.
If you want to open these files just to see what the code looks like, open them with Notepad or other similar plain text applications. In Windows 7, you can right-click the JavaScript file and then choose Edit from the menu. When you do so, the JavaScript file opens in Notepad.
You can edit JavaScript code directly from something like a plain text editor. The changes that you save do affect your composition.
 You can find the code that you write or edit for actions, triggers, and so forth while in Edge Animate in the
 JavaScript_edgeActions file. For example, say that you add an action to a rectangle (such as Play From) so that the code in the Edge Animate code editor looks like this:
sym.play();
// play the timeline from the given position (ms or label)
sym.play(1000);
If you save the project and then open the JavaScript_edgeActions file in a plain text editor, you should see the above code in that file. You can now edit this code. If you want the action to start playing at the 2-second mark instead of the 1-second mark, simply edit 1000 to 2000. Then save and close the file.
You can then check the changes by clicking the HTML file to preview in a browser. The changes appear in Edge Animate the next time you open the project.
If you save edits to the JavaScript file while the composition is still open in Edge Animate, a File Changed dialog box appears, as shown in Figure 13-5.
If you click Yes, Edge Animate keeps the changes that you made outside Edge Animate.
If you click No, Edge Animate doesn’t keep changes that you saved outside Edge Animate.
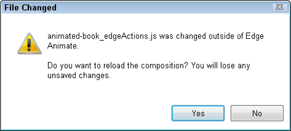
Figure 13-5: You need to reload the composition for saves outside Edge Animate.
If you want to edit your files outside Edge Animate in a plain text editor, close and save the composition beforehand. That way, you don’t run the risk of losing other changes that you might make within Edge Animate while simultaneously editing the JavaScript.
HTML files
Because the HTML language is relatively easy to learn, HTML files are probably the “friendliest” files for non-developers to work with. So, it’s a good idea for you to know at least the basics of HTML. Knowing such basics makes it much easier for you to help place animations within existing web pages.
The HTML file appears alongside the Animate file and some of the JavaScript files. You can instantly recognize the HTML file from the folder structure, because its icon appears the same as your default browser’s icon, as shown in Figure 13-6.

Figure 13-6: You can recognize the HTML file by the browser icon.
You can do a few different things with the HTML file:
Open it for viewing. Simply click the file, and your animation opens in your default browser and begins to play.
Open it for editing. If you right-click the HTML file, you can open the file using Notepad, or some other plain text editor, or even an HTML editor. If you open it for editing, you can do things like edit the title tag (see Chapter 6) or copy and paste portions of the code so that you can insert your animation into existing web pages (see Chapter 15).
For the most part, the HTML file is a shell to house the calls to the JavaScript file. For web browsers to display your animation correctly, they need to know where to find the files that execute your composition. That's how the HTML file comes into play. You use the .html file, or at least parts of it, to put your composition online.
 You can tell that Adobe Edge Animate is using HTML5 by looking at the DOCTYPE tag in the HTML file — a piece of code put at the top of an HTML file that tells the browser what standard the page is written in. In HTML5, the DOCTYPE looks like this:
<!DOCTYPE html>
In HTML4, DOCTYPE looks like this:
<!DOCTYPE HTML PUBLIC "-//W3C//DTD HTML 4.01//EN"
"http://www.w3.org/TR/html4/strict.dtd">
HTML5, in many ways, is about simplifying and reducing the amount of code used.
You can edit the title tag within the HTML file. The title tag defines what is shown in the tab of your browser. If you plan to embed your composition into one part of a web page, the title tag in your Edge Animate composition may not have an effect. The title tag looks like this:
<title>Untitled</title>
You can find this code within the head section, near the top, of the file. If you do edit the title tag within the HTML file and save the file, the changes do appear in Edge Animate.
HTML is written with tags. A tag is a bit of code enclosed by carrots. For example, the title tag looks like this: <title>. Each tag has an opening tag and a closing tag. The closing tag is similar to the opening tag, except it has a slash in it, like this </title>.
You most likely don’t want your first animation to appear as “Untitled” on the Internet, so you probably want to update that, if you didn’t already, from the Properties panel. To do so, simply overwrite Untitled to something more suitable, such as
<title>My First Slideshow</title>
After you save the HTML file and then refresh or reopen your composition in the browser, the title should now appear in the tab as shown in Figure 13-7.
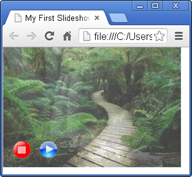
Figure 13-7: Update the title tag so that it doesn’t say Untitled.
If you plan to edit your composition outside Edge Animate in a separate editor, it’s a good idea to save and close Edge Animate before doing so. Otherwise, you run the risk of losing edits and changes that you may make in Edge Animate while editing the code files.
Image folders
Edge Animate creates an image folder when you save your composition, which can inadvertently result in you having two sets of the same images in your folder structure. This happens if you put your images in the same folder in which you save your composition, rather than in a separate folder named Images.
It's best practice to place your images in a folder labeled Images. That way, Edge Animate doesn't create a second set of images in your folder structure.
Having two sets of the same images can lead to confusion; especially if you want to go back and edit them later.
If you decide you don’t want two sets of the same images in the same folder directory and want to delete the redundant set, make sure you don’t delete the folder that Edge Animate created. If you do, you will find your images missing from your composition.
Edge_includes folder
The edge_includes folder contains additional JavaScript files. The difference here is that they are .min files.
The .min.js files found in the edge_includes folder are minified (compressed) JavaScript files. For example, white spaces and comments are stripped out, and they use shorter variable names. That's why when you open one of these files, it may look like a large wall of text. These compressed files allow for faster loading times, which can earn you bonus points from browsers like Google that benchmark stuff like that.
These files tend to be very long, and I don’t cover them here except to mention that (a) they’re important to your composition and (b) they shouldn’t be tampered with or edited for danger of breaking your composition.
It's highly recommended that you don't open nor edit the .min.js files found in the edge_includes folder. Unless, of course, you're trained in such matters.
Creating Edge Animate Files for Use with Other Software Tools
Adobe Edge Animate plays well with other software tools. From the main menu, you can click File and then Publish Settings to choose which kinds of files Edge Animate creates. You choose these settings based on what you want do with the file:
Put it on the web.
Use with other Adobe tools, such as InDesign.
Prepare files compatible with OS X.
When you choose all the Publish settings you want (see Figure 13-8), Edge Animate creates another whole set of folders and files. I go into more detail on publishing options in Chapter 14.
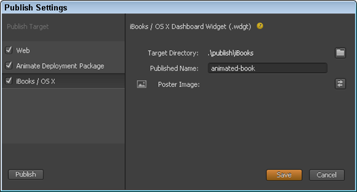
Figure 13-8: Choose the settings best suited for how you want to use the composition.
At the top level of the folder structure, you now see a Publish folder, as shown in Figure 13-9.
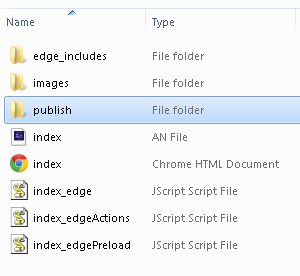
Figure 13-9: Find the Publish folder in the Folder directory.
Within the Publish folder, you find
An Edge Animate package for use with other Adobe tools
A .wdgt folder for use with iBooks Author
A web folder that contains all the files and folders you need to publish to the web
Figure 13-10 shows the folders within the Publish folder.
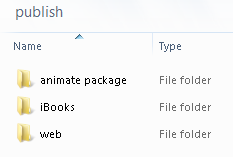
Figure 13-10: The folders within the Publish folder.
Edge Animate package
The Edge Animate package folder contains an .oam file (see Figure 13-11). You can use .oam files with InDesign, Muse, and other Adobe Tools. Basically, Edge Animate compresses the JavaScript and HTML files used for your animation into a format that InDesign can use (the .oam file).
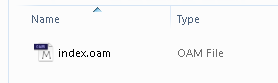
Figure 13-11: Use .oam files with other Adobe tools.
iBooks folder
The iBooks folder contains a .wdgt folder. You can use this folder with Apple's iBooks Author. The .wdgt folder contains another whole series of folders and files, as shown in Figure 13-12. All you need to do is copy or import the .wdgt file for use with iBooks Author.
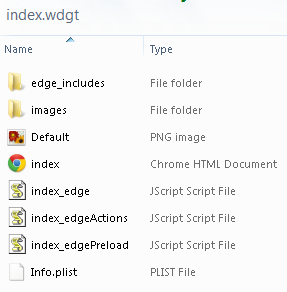
Figure 13-12: The files within the .wdgt folder.
Adobe Edge Animate and Adobe Fireworks
Adobe Edge Animate works very well with Adobe Fireworks both in exporting and in importing one into the other. To get started, you must first download the Edge Animate extension from John Dunning's website: http://johndunning.com/fireworks/about/EdgeAnimate.
Once you’re on Dunning’s site, you can read all about the great integration features between Edge Animate and Fireworks. Dunning’s Fireworks extension supports elements for use in Edge Animate, such as rectangles, text, bitmaps, symbols, circles, layers, shadows, and so on. Dunning also includes notes on which types of elements Fireworks exports as flattened images. He even explains how to export an element as a flattened image if that is what you want. This extension also enables you to export elements with percentage properties as opposed to pixels. Dunning also provides a short list of limitations that Fireworks won’t export properly, such as text elements shifting vertically, depending on the size and the font.
Something that you may find really exciting is the ability to export multi-state Fireworks projects as an Edge Animate symbol. Fireworks does this by exporting the animations as either a series of PNG files or a single sprite image.
The figure shows where to click to download the Fireworks extension for use with Edge Animate.
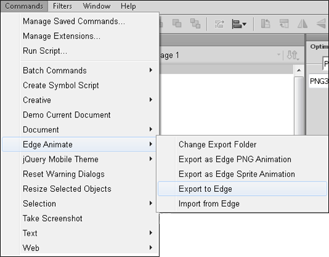
After you have the extension installed, it appears under the Commands menu in the Fireworks interface, as shown here.
You can also import Edge Animate projects into Fireworks. Basically, Fireworks asks you to select the .html or .an file that you want to import. Fireworks then creates a new document based on the same size and color as the Edge Animate document.
Web folder
This folder contains the standard set of Edge Animate files and folders. Edge Animate saves all the files and folders in one folder, which makes it easy for you to work with.