Chapter 17
Synchronizing Elements in an Animation
In This Chapter
![]() Drawing and formatting elements
Drawing and formatting elements
![]() Putting rotating and easing to good use
Putting rotating and easing to good use
![]() Timing text and coordinating effects
Timing text and coordinating effects
In this chapter, I explain how I created an animation of a car driving into a brick wall. I affectionately named this composition “Car Go Boom.” To get the animation to work, I drew the road and some lane markers. I then imported an image of a car, sans the wheels. I had to remove the wheels from the car so that I could create an animation of the wheels turning. I also imported an image of a brick wall so that the car had something to hit. Finally, I added an effect of the car bouncing off the wall and then some text saying “Boom” — hence I made “Car Go Boom.”
My intention in this chapter is to give you a resource for synchronizing elements, using the rotating tool, and effectively using easing.
Drawing Elements onto the Stage
To get started, use the Rectangle tool to draw the road (refer to Chapter 3 for more on drawing elements). Simply draw a black rectangle along the bottom portion of the Stage.
 While drawing your objects, make sure the pin isn’t toggled and that Edge Animate doesn’t automatically create keyframes; otherwise each element you draw and each change you make are recorded as animated keyframes. That could be fun to watch later — to see the iterative process of creating, coloring, placing, and sizing the rectangles — but it probably wouldn’t look too good in the final animation.
If you want to get fancy, you can draw lane markers:
1. Draw a small rectangle.
2. Use the color picker (refer to Chapter 9) to change the color to yellow.
3. Angle the lane marker to a –10 skew (refer to Chapter 7).
4. Place the lane marker in the middle of the road.
You can use the guide lines that magically appear to align the element in the center.
5. Copy and paste the lane marker as many times as you need to.
Repeat until the road has a sufficient number of lane markers, as shown in Figure 17-1.

Figure 17-1: Stage is set with a road and lane markers.
If, after placing all the lane markers in the road, you decide you want smaller markers, you can adjust their sizes all at once:
1. Select one of the markers.
2. While pressing Shift on the keyboard, select the other markers.
3. In the Properties panel, adjust the size by changing the Width.
The Height should stay proportional if the Link Scale is on.
You can also import the brick wall at this time so that it’s at the far end of the road.
Now it’s time to import and synchronize a car wheel.
Rotating an Element
Adobe Edge Animate CC isn’t the equivalent to stop-motion animation. That is, you don’t have to create a keyframe for each rotation of a wheel. If you have to do that, you may as well create a claymation composition.
Here’s how to make your wheel roll:
1. Import an image of a car wheel and position it right above one of the lane markers.
2. Activate the pin and adjust the Playhead in the Timeline so that you can create a transition.
3. Use the mouse to move the wheel off the Stage.
4. Change the Rotate attribute (refer to Chapter 7) to 360 degrees (see Figure 17-2).
Your composition should now look like Figure 17-3.
You can preview this animation on the Stage.

Figure 17-2: Set the Rotate property to 360.
You can also use the Properties panel (instead of the mouse) to roll the wheel off the Stage instead of the mouse. To do so, in the Position and Size section, set the L property so that the wheel is just off the Stage (refer to Chapter 8 for more on positioning and sizing). If you have Global selected, then you would simply set the X property.
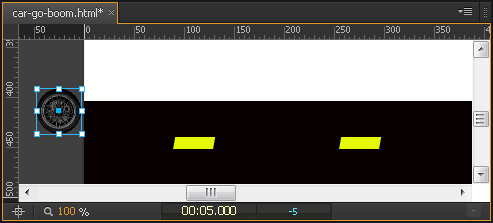
Figure 17-3: Positioning the element off the Stage.
Synchronizing More than One Element
Now that you’ve practiced making one wheel roll down the road, it’s time to import the car image and copy and paste the first wheel to create a second wheel.
If you’ve been following the chapter, now is a good time to delete the first animation you made of the wheel rolling down the road by itself. To do so, select that keyframe in the Timeline and delete it. When you delete the keyframe, the object isn’t deleted. To delete the object, you need to select it from the Stage, and then delete it.
 Before you start importing new images and copying and pasting the wheel, be sure to toggle off the pin and make sure the stop watch isn’t red so that you don’t start creating automatic keyframes. You don’t want each import, change, and move animated.
Aligning the wheels:
1. Align the car image so that the wheel well is aligned with the wheel.
2. Copy and paste the first wheel to create a second wheel. Place the second wheel in the empty wheel well.
Now it’s time to synchronize the car and the wheels so that they all travel together down the road.
While you import your images, you may need to use the Send Backward feature (to find this feature, open the Modify menu from the main menu, then choose Send Backward) to send the image of the wheel behind the image of the car. Figure 17-4 shows the different options available for arranging your elements.
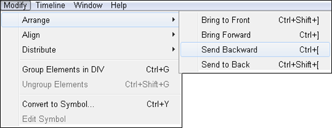
Figure 17-4: The Modify menu for arranging the order of objects.
 Adobe Edge Animate CC does support images with transparent backgrounds. To keep the transparent background of your image, save it as a
 .png file; otherwise, you may have square white edges along the perimeter of your wheels, which could look funky as the car is cruising down the road.
At this point, your composition should look like Figure 17-5 (the wall isn’t shown), with the road drawn and the three images (car and two wheels) in place and selected.

Figure 17-5: Preparing for synchronization.
1. Enable Auto Keyframe mode (the stopwatch appears red), toggle the Pin and move the Playhead in the Timeline to where you want the animation to end.
For example, if you want the car to take 5 seconds to cross the Stage, move the Playhead out to the 0:05 mark and keep the pin at 0.
2. Select the two wheels and the car by clicking on them with the mouse while holding down Shift so that you have all three elements selected.
3. Use the mouse to click and drag the three objects until the front end of the car hits the wall.
Don’t worry if your hand is a little shaky while dragging the objects. That actually improves the appearance of a car driving down the road and smacking into a wall.
4. From the Timeline, make sure the Playhead is at the point in time when the car hits the wall, leaving the Pin at the beginning of the animation.
5. Select only one of the wheels and change the Rotate attribute to 360.
6. Select the other wheel and set the Rotate attribute to 360.
If you play the animation now, the car should appear to be traveling down the road and stopping when it meets the wall.
Using Easing
In this section, I describe how to create the appearance of a car bouncing off a brick wall by using easing. For more information on easing, refer to Chapter 4.
Keep an eye on where the Playhead and Pin are in the Timeline. Also keep an eye on the Pin to see whether it’s toggled and whether the stopwatch icon is activated to create automatic keyframes.
Here’s how to add easing to an element. The following steps continue from the example in the preceding section:
1. Place the Playhead at the end of the animation where the car meets the wall.
2. Select the elements to which you want to add an easing attribute.
In this case, you select the car and two wheels.
Now you can edit the easing attributes by using the Easing tool in the Timeline as highlighted in Figure 17-6.
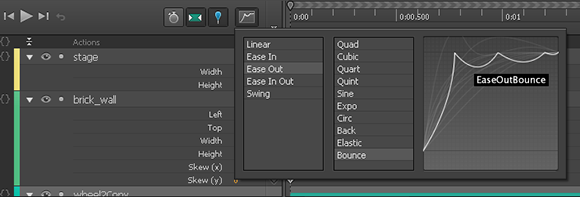
Figure 17-6: Using the Easing tool.
3. Click the Easing tool icon (Figure 4-11).
This opens several options for using easing.
4. Choose one of the options and then choose a more detailed option.
If you click different options, the graph on the right updates showing a representation of the easing effect.
For this example, choose Ease Out and then Bounce.
Notice that three of the five easing attributes are named with either In or Out or In Out. Here’s a brief description of those terms:
 In: The easing effect takes place at the beginning of the animation.
Out: The easing effect takes place at the end of the animation.
In Out: The effect happens at both the beginning and the end of the animation.
If you play the animation now, you should see the wheels rotating, the car moving down the road, and when the car meets the wall, you should see it bounce back and forth. Okay, so it’s more like the car ran into a trampoline rather than a brick wall, but you discovered how to use easing. Now is a good time to experiment with all the different easing attributes.
It can be difficult to see the full easing effect watching the animation play in real time. You can watch the animation in slow motion by scrubbing the Playhead back and forth in the Timeline. Doing so allows you to see the car bounce in slow motion.
Timing Some Text
Just for practice, try adding text to appear at the point when the car hits the wall.
1. Place the Playhead and Pin in the Timeline at the point where you want the text to appear.
If you want to time the text to appear just after the first crash, scrub the Timeline so that you see the car hit the wall and then start to bounce back — that’s where you want to place the Playhead and Pin. That way, the text appears as the car bounces back and forth off the wall.
2. Insert a text box (refer to Chapter 10) and type some text, such as Boom.
3. Reduce the Opacity setting (refer to Chapter 8) to 0 (see Figure 17-7).
This gives the appearance that the text isn’t there, as shown in Figure 17-8.
4. Make sure the Pin is toggled and move the Playhead a smidgen down the Timeline.
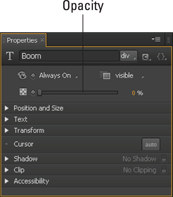
Figure 17-7: Reduce the Opacity to zero.
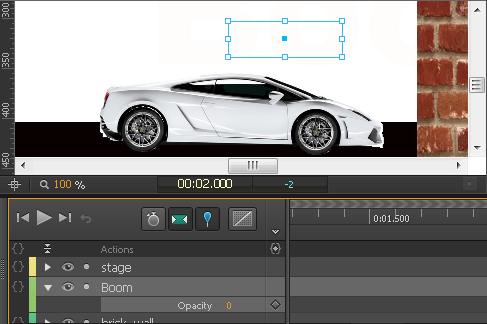
Figure 17-8: The text doesn’t appear with an Opacity of 0.
5. Change the Opacity to 100%.
This gives the appearance that the text pops into view as the car hits the wall. Figure 17-9 shows the Stage with the text.
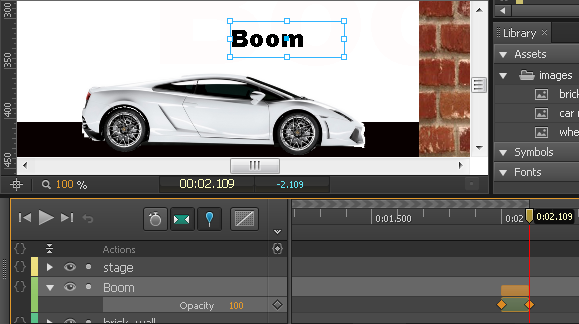
Figure 17-9: Text appears at 100% Opacity.
You can change the name of the elements to better suit what they actually represent. For example, if you have several text boxes in your animation, numbering them isn’t the best way to keep track of them. Instead, you can rename them for better representation. In this case, renaming the text box as Boom helps you remember what that element is.