Chapter 3
Working with a New Composition
In This Chapter
![]() Feeling welcome to the Welcome screen
Feeling welcome to the Welcome screen
![]() Starting from scratch
Starting from scratch
![]() Setting the Stage
Setting the Stage
![]() Starting from an existing web page
Starting from an existing web page
![]() Working with templates
Working with templates
![]() Adding the pretty pictures
Adding the pretty pictures
![]() Drawing and editing elements and text
Drawing and editing elements and text
This chapter gets you working in Adobe Edge Animate CC. I discuss the Welcome screen and all of the informative links to tutorials and the help community — and I also show you how to make it all quiet.
I show you how to size the Stage so that it can have a static size or a responsive design that sizes the Stage to the size of the browser window.
Chapter 3 also discusses how to import existing web pages. Edge Animate can open simple web pages and turn any images into elements — which you can then animate or enhance with actions. (For more about elements and actions, see Chapter 5.)
Part of working with a new composition is knowing how to add images as assets that become part of the composition. This chapter discusses that vital bit of knowledge, and shows you how to build up what’s on the Stage by drawing elements and adding text boxes.
Starting a New Composition
When you first open Adobe Edge Animate CC, you’re greeted with a very informative Welcome screen, as shown in Figure 3-1. The Welcome screen has many components to it, which are grouped into three different sections. On the left side of the screen you can open an existing file, create a new file, create a file from a template, or view a list of recent files.
The remainder of this section summarizes the Welcome screen and then branches off to cover two vital techniques:
 Resizing the Stage: You can size the Stage either by pixel count or by percentage.
Importing an existing web page: You can open existing HTML files.
Also on the Welcome screen, down in the bottom-left corner, there are two little icons. You will most likely immediately recognize both of them. The Facebook icon takes you directly to the Edge Animate Facebook page; the Twitter icon connects you to the Edge Animate Twitter feed.
In the top-middle of the Welcome screen, you can find a menu that consists of
What’s New: This section provides a list of all the latest features, additions, and updates since the last release.
Getting Started: The Getting Started section of the Welcome screen shows several boxes in the main part of the screen. From here, you can walk through several tutorials and examples that are built directly into Edge Animate (see Figure 3-1).
Resources: The Resources section of the Welcome screen provides a list of links that you can click for additional help, tutorials, video, and FAQs from the community as shown in Figure 3-2. From the Resources section, you can also view and download sample projects as well as access the JavaScript API.
Quiet: If you prefer a nice, quiet space from which to work when you open Edge Animate, all you have to do is click Quiet from the Welcome screen. Doing so removes the tutorials and lists that you may normally see.
 Edge Animate remembers whichever Welcome screen option you choose. If you close the software with Quiet selected, then the next time you open Edge Animate, you see the Quiet Welcome screen. The same holds true if you close the program with any of the other options selected.
 An Internet connection is required to gain access to many of the features listed on the Welcome screen.
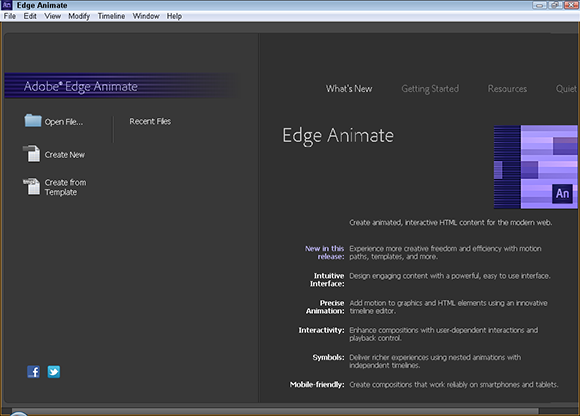
Figure 3-1: The Adobe Edge Animate CC Welcome screen.
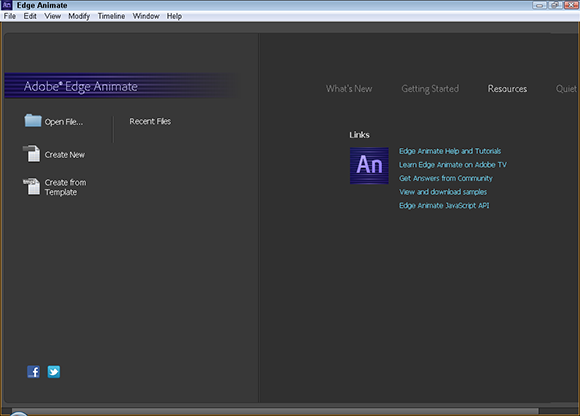
Figure 3-2: The Welcome screen has a list of available resources.
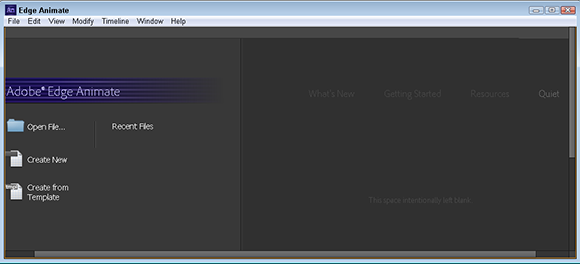
Figure 3-3: The Quiet option dims out all the clutter.
The first time that you open Edge Animate, you may want to start a brand-new composition. To do that, simply click the Create New icon from the left side of the screen (refer to Figure 3-1). Later, after you have some saved projects, you can click either Open File or Recent Files to open your existing compositions.
When you click Create New, Edge Animate presents a brand-new blank Stage from which you can start your work.
Resizing the Stage
The Stage is where you will place your elements, such as images, text, and drawn objects. The Stage is a live HTML window, which means that what you see on the screen, is what your audience sees when they view and interact with your composition. You can size the Stage a couple different ways:
Pixels: Adobe Edge Animate CC enables you to set the Stage to remain a specific size no matter the size of the browser window.
Percentage: For those who prefer a more responsive web design.
Testing responsive web design: You may want to change the background color of the Stage to test the responsiveness of your design. (I go into detail on how to do this test in the next couple of sections.)
Sizing your Stage by pixel values
Most likely one of the first steps you’ll want to take is to size your Stage properly. If you plan to insert your animation into an existing web page, first determine how much space you want your animation to take up on that page, and then size the Stage accordingly.
To resize the Stage, click the orange numbers in the Stage section of the Properties panel — in the far-left column near the top of the screen — as shown in Figure 3-4. Clicking the width or height numbers allows you to type in the exact dimensions (in pixels) that you want your Stage to have.
If you don’t want to type in the numbers, Edge Animate gives you an alternative method for resizing the Stage: Simply place your cursor over one of the orange numbers. When the cursor turns into a double arrow (as shown in Figure 3-4), you can click and drag to increase or decrease the size of the Stage.
Sizing your Stage by percentage of screen size
If you want to create an animation that doesn’t have to fit any specific dimension, then you should switch from pixels (px) to percentage (%), by clicking the toggle (see Figure 3-5). This is one step to creating a responsive web design. When you size the Stage by screen percentage instead of by pixel values, the Stage sizes itself according to the size of the parent element.
 One example of a parent element can be the browser window itself — if the animation is a standalone web page. However, if the animation is one part of a web page, then the parent element can be a
 div element within which the animation is nested.
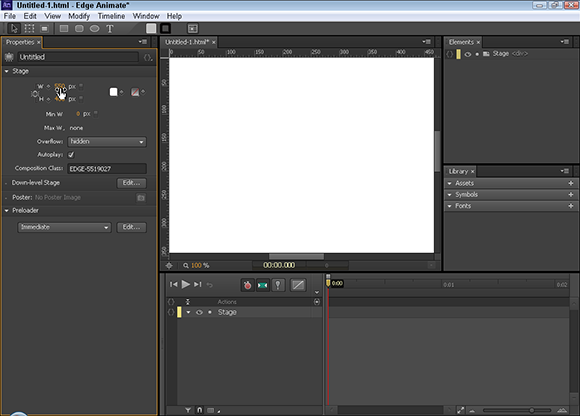
Figure 3-4: Resizing the Stage by dimensions (in pixels).
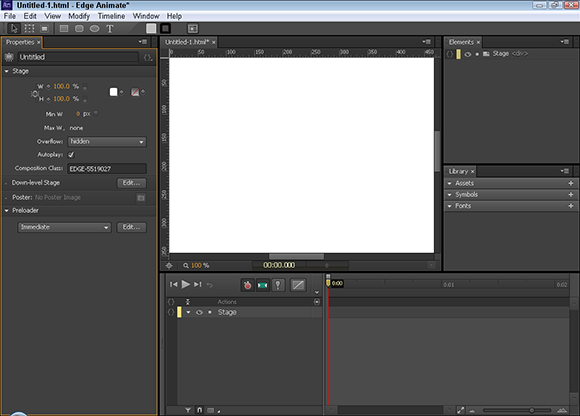
Figure 3-5: Sizing the Stage by percentage of screen.
To have your Stage fill the entire browser window, set the Stage width and height to 100%, as shown in Figure 3-6. To have your Stage fill half the browser window, set the Stage to 50%; and so on, depending on how much of the browser window you want your animation to occupy.
By default, the background of the Stage is white. Therefore you won’t see any difference in the Stage when you switch between px and %.
To test the difference between using px and % for Stage size, change the background color of the Stage to something other than white, such as red. Then experiment with different percentages and px dimensions to see the different effects.
To change the background color of the Stage (as shown in Figure 3-6), click the white square to bring up a color picker.
You can tell Edge Animate to keep the width and height proportions the same by clicking the Link Width and Height icon (highlighted in Figure 3-7). By default, the Link Width and Height icon is turned off; with that default in effect, Edge Animate will not keep the width (or height) in the same proportion when you resize.
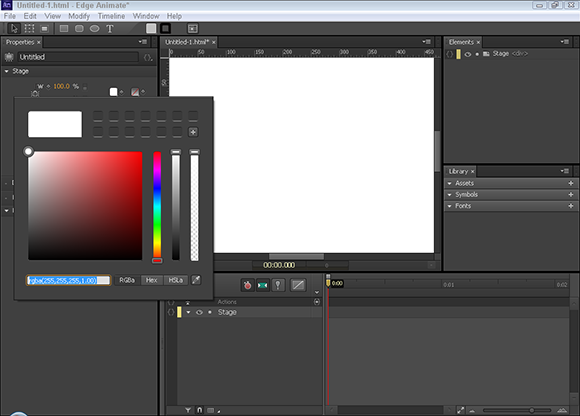
Figure 3-6: Changing the background color of the Stage.
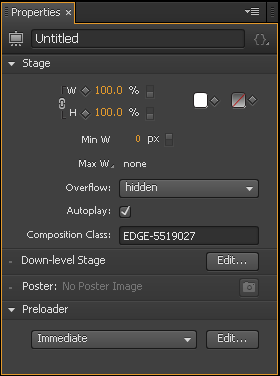
Figure 3-7: Using link width and height to keep proportions.
Importing HTML
Adobe Edge Animate CC is very HTML-friendly. If you have an existing — albeit a very basic — HTML web page that you want to animate, then just click Open File from the Welcome screen to start working with it.
Make sure all images and associated files are in the same folder as the htm file when you open it — or in a nested folder in the htm file. Otherwise they won't appear on the Stage.
When you’re importing existing HTML, keep in mind the following:
Edge Animate may not like your CSS files
Images in your htm file appear in the Library panel.
Text is imported as an element.
Possible issues with CSS files
Keep in mind that the simpler the HTML page is that you import, the easier it is for Edge Animate to open it.
If you do have trouble opening your htm file, try removing all associated CSS files. You may fret at the loss of that earlier work, but keep in mind that you can quickly replace all of that design work with Edge Animate.
If you open an existing HTML file with menus and such, you can animate the menus and elements but you can’t reformat the color and some other aspects. The reason for this is that Edge Animate only allows animation sequences for imported HTML objects so as not to fight with any CSS styling you may have already applied. It can get a bit messy when you apply two styles to an element, which can lead to unexpected results.
Images appear in the Library panel
If the HTML page that you’re importing contains images, then Edge Animate imports those images into the Library panel as an asset (see Figure 3-8).
Figure 3-8: Here the original Edge Animate icon was imported as an asset into the Library panel.
You can now treat the imported images as elements that you can animate or add interactive attributes; you can make the image move about the screen and/or make the image a link. For more information on the Library panel, see Chapter 12.
Text is imported as an element
When you import an HTML file with text, Animate imports that text as an element. You can select the text elements and animate them or add actions to them; however, you can’t edit the text.
If the original HTML file used H1 or paragraph tags for text, then Animate recognizes those attributes and displays them in the Elements panel, as shown in Figure 3-9.
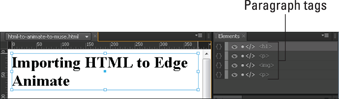
Figure 3-9: Text is imported as an element.
Working with Templates
Templates were introduced in Edge Animate 2.0. This feature removes the necessity of reinventing the wheel every time you want to start a new composition. Sure, you could always start a new composition from a saved file, but Templates enable you to start a new project that already contains attributes and elements that you want to use without having to rewrite an existing saved file. Templates are very useful when you want to create several similar compositions and you want to start animating right away — without setting up your preferences from a brand-new composition or having to remove or swap out elements from a saved file. You can find the Templates from the main menu under File (as shown in Figure 3-10).
From the File menu, you can
Create from Template: Here’s where you start a new composition from a saved Template, to do this, you must first save a Template and then import that Template into Animate. When you click Create from Template, the Template Viewer opens and you see thumbnails of your imported Templates (as shown in Figure 3-11). Then you choose the Template you want to work with.
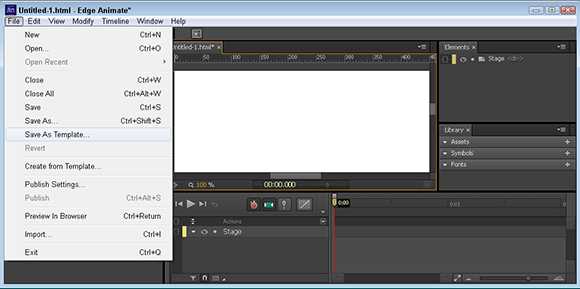
Figure 3-10: Access the Templates from the File menu.
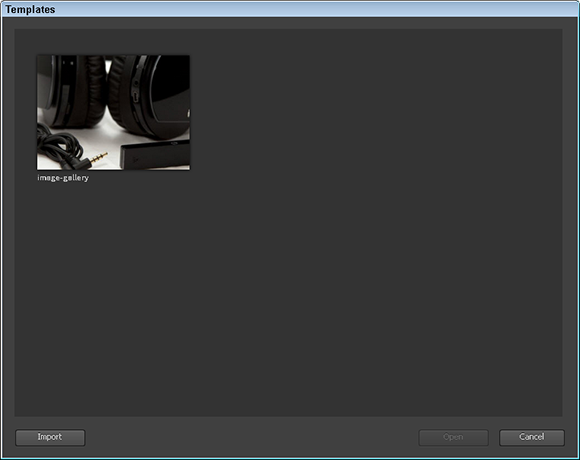
Figure 3-11: Choose a Template from the Template Viewer.
Save As Template: this saves your current composition as a Template. Saved Templates include anything and everything in your composition. This includes Symbols, images, text, fonts and custom amendments you made including the size of the Stage. When you click Save As Template, and then choose a spot to save the file, Animate creates an antmple file. When you save a Template, you are then prompted to import that Template. I suggest you do that, so you can select it later when you choose Create from Template.
 If you try to open an
 antmple file from your file directory and that file has already been imported, you'll get this message:
The Animate Template file contains a template that is already imported. Overwrite the existing template?
You can then choose Yes or No. If you try to open an antmple file from your file directory that has not already been imported, then Edge Animate imports that Template for you. You can then open that template by clicking Create from Template.
If you decide you no longer want a particular Template to appear in the Template Viewer, click the garbage can from the Template Viewer when you hover over a particular Template thumbnail, as shown in Figure 3-12.
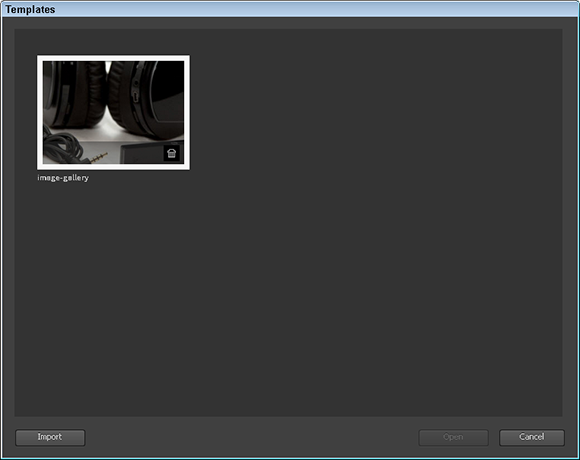
Figure 3-12: Delete unwanted Templates.
When you delete a Template, the saved Template file remains on your hard drive (or in the specific file directory to which you originally saved it). Deleting a Template simply removes it from Edge Animate; you can no longer choose it from the Template Viewer.
Drawing and Editing Elements, Importing Images, and Writing Text
Adobe Edge Animate CC provides drawing tools so that you can create rectangles, rounded rectangles, and ellipses on the Stage — which then become elements that you can animate and add actions to. The same is true for importing images and writing text. Figure 3-13 shows where you can find the drawing tools directly under the main menu.
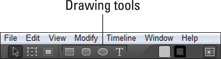
Figure 3-13: Drawing tools.
Adobe Edge Animate CC provides a range of tools you can use to create elements:
Drawing tools: You can draw rectangles, rounded rectangles, and ellipses (including circles).
Editing the corners: If you want to edit the roundness of your corners, Edge Animate provides ways to make it happen.
Importing images: As a designer, you most likely have some choice images that you want to animate. Now you can.
Writing text: There is a very good chance that you want to add some text to your composition. Animate makes that task easy for you.
Drawing rectangles
Drawing a rectangle is as easy as clicking the Rectangle tool and then clicking and dragging inside the Stage.
When you animate the rectangles you draw, they become elements on the Stage. Then you can turn them into Symbols, assign them actions and triggers, and so on.
When you draw an element on the Stage (such as a rectangle) and other elements are already on the Stage, Edge Animate automatically shows pink guidelines (see Figure 3-14). These guidelines can help you create equal-size elements and align your elements evenly with each other.
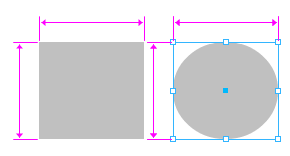
Figure 3-14: Use the guidelines to help create equal-size elements.
Creating rounded rectangles
The Rounded Rectangle tool is similar to the Rectangle tool, except the corners are round instead of square.
You can affect how round the corners are by experimenting with the way you click and drag when you draw a rounded rectangle. For example, you can draw a circle, a pill shape, or a square with slightly round corners — and just about anything in between. Figure 3-15 shows some of the different shapes you can draw with the Rounded Rectangle tool.
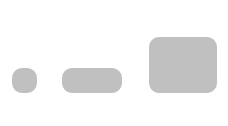
Figure 3-15: Drawing different shapes with the Rounded Rectangle tool.
Drawing ellipses
The Ellipses tool makes it easy to draw circles. Just select the Ellipses tool (as highlighted in Figure 3-13), and then click and drag to draw a shape with rounded corners. Figure 3-16 shows a perfect circle element.
To draw a perfect circle, hold down Shift while you click and drag. This keypress forces the proportions of the elements to retain the circle shape no matter how you click and drag.
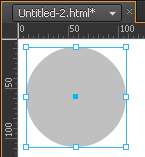
Figure 3-16: Draw a perfect circle with the Ellipses tool by holding Shift.
Editing the Corners of Elements
No matter what type of element you draw — rectangle, rounded rectangle, or ellipse, or circle — you can then select it and edit each corner (if it has corners) independently. To do so from the Properties panel, find Corners, and then (if necessary) click the white arrow to display its attribute settings.
Figure 3-17 shows the Corners attributes in the Properties panel. In this example, you can edit eight different points on the element, and the top-right corner is set to 0 so the corners are straight. The other corners are set to 50 so that the corners are round.
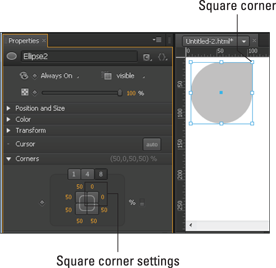
Figure 3-17: Use the Corners attributes in the Properties panel to edit corners.
To edit all the corners at once, select 1, edit the orange number on the right, and then press Enter. All the corners become uniform, as shown in Figure 3-18.

Figure 3-18: Editing all corners at once from the Corners attributes in the Properties panel.
Importing images
You can import images from the menu bar; click File→Import. A navigation window opens, prompting you to select an image. Navigate to where you saved your image, then select the image, and finally choose Open from the navigation window.
Adobe Edge Animate CC supports drag and drop. Instead of clicking through the File menu, you can drag an image from your desktop directly onto the Stage.
When you have an image in your composition, several new options appear in the Properties panel, as shown in Figure 3-19.
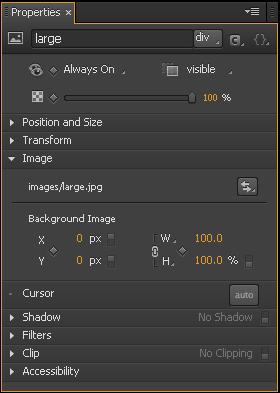
Figure 3-19: New options in the Properties panel.
Writing text
Adding text to your Edge Animate project is a matter of a few clicks and typing. And the best part is that the text you type is considered selectable type while it’s viewed in a browser. Edge Animate will not convert your text into an image for the final output — which means search engines can parse your text and index it for search results. Ultimately, using text in Edge Animate helps — or at least doesn’t hurt — your website’s SEO (search engine optimization).
Adobe Edge Animate CC is considered SEO-friendly; it places text in the JavaScript file as text, not as an image of text. Therefore, search engines can find any text that you type into Edge Animate and use in the final animation placed on your site.
To insert text into your Edge Animate composition, click the Text tool, which is located directly under the main menu bar in the top-left corner (see Figure 3-20).
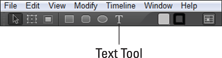
Figure 3-20: Selecting the Text tool.
With the Text tool selected, click and drag over the Stage. You see a thin, blue rectangle appear as you click and drag. When you release the left mouse button, you also see a gray text box with a blinking cursor (as shown in Figure 3-21).

Figure 3-21: A blank text box.